PhonePe Payment Gateway Integration using API: In the ever-changing world of online shopping and electronic payments, a smooth payment process is critical. Being proficient in integrating PhonePe Payment Gateway via API is a game-changer for PHP developers looking to add cutting-edge payment features to their apps. With the help of this thorough tutorial, PHP developers should be able to integrate PhonePe’s reliable payment options into their apps with ease.
Chapter 1: Understanding PhonePe Payment Gateway
In order to begin the process of becoming an expert in PhonePe Payment Gateway Integration, it is essential to understand the basic ideas. This chapter explores the key attributes and advantages of PhonePe as a payment gateway, emphasising the reasons it distinguishes itself in the crowded market.
Selecting the appropriate payment gateway is essential for businesses hoping to offer a safe and seamless transaction experience in the ever changing world of digital payments. Before we can begin to grasp PhonePe Payment Gateway Integration, we must have a thorough understanding of what makes PhonePe unique in the world of online transactions.
New User Onboarding: Open and Simple
PhonePe’s user happiness guarantee starts with a simplified onboarding procedure. Thanks to PhonePe’s user-friendly interface, new users may easily register and include the payment gateway into their applications. The ease of use of PhonePe’s onboarding procedure guarantees that companies may quickly take use of its advantages without needless hassles.
Free Integration Offer: A Game-Changer for Developers
PhonePe Payment Gateway is presently giving free integration with no commission fees for the time being, which is an exciting step for developers. With no financial constraints, this audacious project seeks to inspire developers to investigate the possibilities of the PhonePe Payment Gateway. PhonePe provides developers with little financial commitment to test and install the payment gateway by eliminating integration costs and commission charges temporarily.
Features that Define PhonePe
Understanding PhonePe Payment Gateway involves delving into its standout features:
- User-Friendly Interface: PhonePe is designed with the end-user in mind, ensuring a smooth and intuitive experience for customers making transactions.
- Security Measures: PhonePe prioritizes the security of transactions, implementing robust measures to safeguard user data and financial information.
- Versatile Payment Options: Whether it’s UPI, cards, or net banking, PhonePe supports a variety of payment instruments, providing flexibility for both businesses and users.
- Real-Time Transaction Updates: PhonePe ensures real-time updates on transaction statuses, keeping both users and businesses informed at every step of the payment journey.
By grasping the unique advantages and user-centric features of PhonePe, businesses and developers can make informed decisions when integrating this powerful payment gateway into their applications.
Chapter 2: Setting Up Your Development Environment
Starting the process of learning PhonePe Payment Gateway Integration calls for a development environment that is ready. We’ll walk you through all the necessary procedures to set up your development environment in this chapter, so that the integration process runs smoothly.
Prerequisites
Before diving into the technical details, it’s crucial to ensure that your development environment meets the necessary prerequisites for PhonePe integration. Here’s a checklist to get you started:
- PhonePe Developer Account: Begin by creating an account on the PhonePe Developer Portal. This account will provide you with access to the resources and documentation needed for seamless integration. Login to PhonePe.
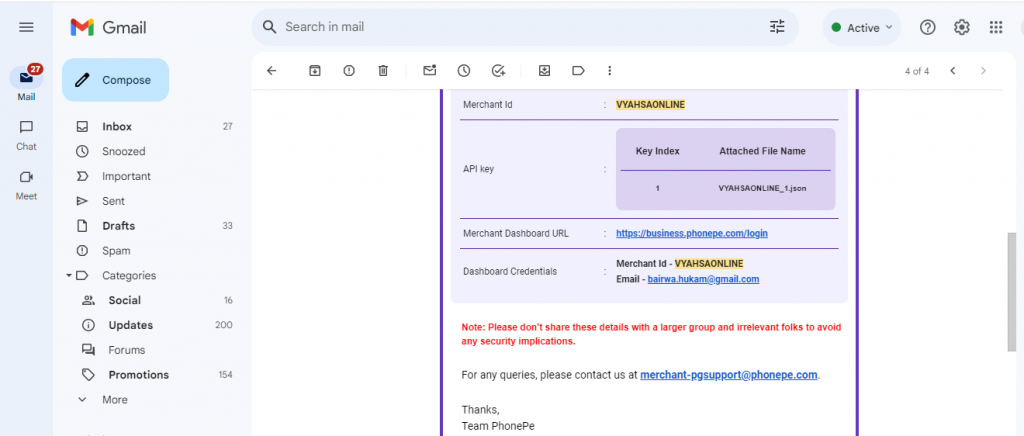
- API Credentials: Obtain your API credentials, including the Merchant ID and API Key, from the PhonePe Developer Portal. These credentials are essential for authenticating your requests to the PhonePe API.

- Testing Environment: Familiarize yourself with PhonePe’s testing environment, often referred to as the sandbox or test environment. This environment allows you to simulate transactions and test your integration without affecting real transactions.
- Production (Live) URL:
- API Base URL:
https://api.phonepe.com- Sandbox (Testing) URL:
- API Base URL for Sandbox:
https://api-preprod.phonepe.com
Chapter 3: Exploring PhonePe API
A deep comprehension of the PhonePe API becomes essential as you go in learning PhonePe Payment Gateway Integration. We will explore the PhonePe API’s complexities in this chapter, dissecting its endpoints, request and answer formats, and the fundamental processes that enable smooth interactions.
Overview of PhonePe API
The PhonePe Payment Gateway and your application are connected using the PhonePe API. It gives developers the ability to safely start and handle transactions. Understanding the API’s basic elements is essential before you begin integrating it into your system:
- Endpoints: The API comprises various endpoints, each serving a specific purpose. Familiarize yourself with essential endpoints like payment initiation, status checks, and callbacks.
- Request and Response Formats: Understand the structure of requests you need to send to PhonePe for different operations. Similarly, gain insights into the format of responses you can expect, enabling your system to interpret and respond appropriately.
- Authentication: API requests to PhonePe must be authenticated to ensure secure communication. Typically, this involves including API credentials (Merchant ID and API Key) in the request headers.
Chapter 4: Initiating Transactions with PHP
It’s time to dig in and learn about the practical side of utilising PHP to initiate transactions now that you have a better understanding of the principles of PhonePe Payment Gateway API. We will walk you through the process of writing PHP code in this chapter so that you can easily include PhonePe Payment Gateway into your application.
Setting the Stage
Before delving into the PHP code, ensure that you have the necessary prerequisites in place:
- API Credentials: Obtain your PhonePe API credentials, including the Merchant ID and API Key. These credentials authenticate your requests to the PhonePe server.
- Development Environment: Make sure your PHP development environment is set up and running smoothly. This includes having a web server (e.g., Apache or Nginx) and PHP installed on your system.
Crafting the Payment Request
To begin a payment, you must create a request that includes all necessary information, including the merchant ID, transaction ID, amount, and customer information in PhonePe Payment Gateway. Let’s use a little sample of PHP code to demonstrate this procedure, assuming your file name having this code is phonepeRequestHandler.php:
<?php
// Replace these with your actual PhonePe API credentials

$userdata=$_POST;
$merchantId = 'YOUR_MERCHANT_ID'; // sandbox or test merchantId that you have
//$apiKey = "e5b7876c-7864-771b-45f6-b61234567ec9"; // sandbox or test APIKEY
$apiKey = "YOUR_API_KEY"; // sandbox or test APIKEY
$redirectUrl = 'https://www.example.com/phonepeResponseHandler.php';

// Set transaction details
$user_id = $userdata[user_id];
$order_id = $user_id . '-' . rand(111111, 999999);
$name = $userdata[name];
$email = $userdata[email];
$mobile = $userdata[mobile_number];
$amount = $userdata[amount]; // amount in INR
$description = 'Payment for services';

$paymentData = array(
    'merchantId' => $merchantId,
    'merchantTransactionId' => $order_id, // your transaction transactionID
    "merchantUserId" => $user_id,
    'amount' => $amount * 100,
    'redirectUrl' => $redirectUrl,
    'redirectMode' => "POST",
    'callbackUrl' => $redirectUrl,
    "mobileNumber" => $mobile,
    "paymentInstrument" => array(
        "type" => "PAY_PAGE",
    )
);

$jsonencode = json_encode($paymentData);
$payloadMain = base64_encode($jsonencode);
$salt_index = 1; //key index 1
$payload = $payloadMain . "/pg/v1/pay" . $apiKey;
$sha256 = hash("sha256", $payload);
$final_x_header = $sha256 . '###' . $salt_index;
$request = json_encode(array('request' => $payloadMain));

$curl = curl_init();
curl_setopt_array($curl, [
    CURLOPT_URL => "https://api.phonepe.com/apis/hermes/pg/v1/pay",
    CURLOPT_RETURNTRANSFER => true,
    CURLOPT_ENCODING => "",
    CURLOPT_MAXREDIRS => 10,
    CURLOPT_TIMEOUT => 30,
    CURLOPT_HTTP_VERSION => CURL_HTTP_VERSION_1_1,
    CURLOPT_CUSTOMREQUEST => "POST",
    CURLOPT_POSTFIELDS => $request,
    CURLOPT_HTTPHEADER => [
        "Content-Type: application/json",
        "X-VERIFY: " . $final_x_header,
        "accept: application/json"
    ],
]);

$response = curl_exec($curl);
$err = curl_error($curl);

curl_close($curl);

//echo "---------------- Response Data:";
//echo '<pre>';
//print_r($response);
//echo '</pre>';

if ($err) {
    echo "cURL Error #:" . $err;
} else {
    $res = json_decode($response);
    echo "Success";

    if (isset($res->success) && $res->success == '1') {
        $paymentCode = $res->code;
        $paymentMsg = $res->message;
        $payUrl = $res->data->instrumentResponse->redirectInfo->url;

        header('Location:' . $payUrl);  //you can comment this line if you want to print the $response in UI
    }
}
?>
If you update the code as below, you can print the message on web-browser for the response received from phonePe.
echo "---------------- Response Data:";
echo '<pre>';
print_r($response);
echo '</pre>';

//header('Location:' . $payUrl);  //you can comment this line if you want to print the $response in UI
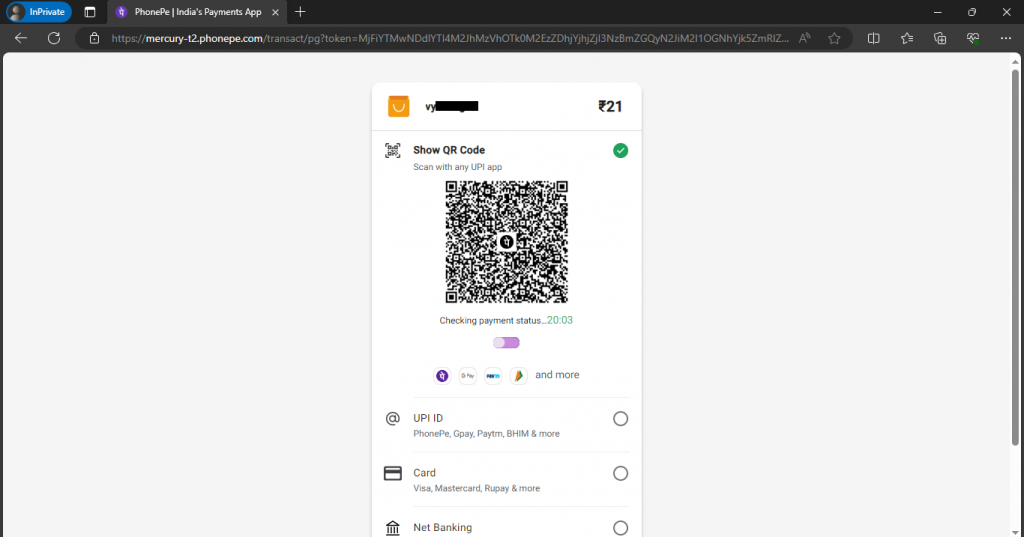
If you are getting a response something like above, then uncomment the header(‘Location:’ . $payUrl); It will open the payment page from PhonePe, see below for reference.
Chapter 5: Handling Callbacks and Responses
Well done on your successful PhonePe Payment Gateway API transaction starting! We will examine the important topic of managing callbacks and answers in this chapter. PhonePe notifies your server asynchronously after a payment is made in order to keep you informed about the progress of the transaction. Effectively handling these callbacks is essential to keeping your system and PhonePe payment gateway in sync.
Understanding Callbacks
Webhooks, or callbacks, are HTTP POST requests that PhonePe Payment Gateway sends to a callback URL that is given at the time the payment is initiated. These callbacks provide crucial transactional data, enabling your server to update the order status and take other required actions.
Setting Up the Callback URL
Make sure you have a dedicated callback URL set up in your PhonePe Payment Gateway merchant dashboard or ask the support team before getting started with the PHP code to handle callbacks. This URL ought to direct users to a server script that handles handling incoming callbacks.
PHP Code for Callback Handling
Let’s create a basic PHP script to handle PhonePe Payment Gateway callbacks. This script should be accessible via the callback URL you configured earlier i.e. phonepeRequestHandler.php
<?php

$callbackResponse = $_POST;

// Replace these with your actual PhonePe API credentials
$merchantId = $callbackResponse['merchantId'];
$merchantTransactionId = $callbackResponse['transactionId'];
$saltKey = 'e5b7876c-7864-771b-45f6-b61234567ec9';
$saltIndex = 1;

// Construct the URL
$url = "https://api.phonepe.com/apis/hermes/pg/v1/status/{$merchantId}/{$merchantTransactionId}";

// Calculate X-VERIFY header
$payload = "/pg/v1/status/{$merchantId}/{$merchantTransactionId}" . $saltKey;
$sha256 = hash("sha256", $payload);
$final_x_header = $sha256 . '###' . $saltIndex;

// Set headers
$headers = array(
    'Content-Type: application/json',
    "X-VERIFY: " . $final_x_header,
    'X-MERCHANT-ID: ' . $merchantId,
);

// Initialize cURL session
$curl = curl_init($url);

// Set cURL options
curl_setopt($curl, CURLOPT_RETURNTRANSFER, true);
curl_setopt($curl, CURLOPT_CUSTOMREQUEST, 'GET');
curl_setopt($curl, CURLOPT_HTTPHEADER, $headers);

// Execute cURL session
$encoded_response = curl_exec($curl);

// Close cURL session
curl_close($curl);

// Decode and print the response
$decoded_response = json_decode($encoded_response, true);

//echo " After the status call : ";
//echo '<pre>';
//print_r($decoded_response);
//echo '</pre>';

// WRITE YOUR CUSTOM code after getting response from PhonePe. $decoded_response is holding the decoded
// response from PhonePe
    $order_status = $decoded_response['code'];]

    if ($order_status == 'PAYMENT_SUCCESS') {
        // Handle success case
		$status = 'success'
    } else {
        // Handle error case
        $status = 'fail';
    }
?>
This script does the following:
- Retrieves the raw POST data sent by PhonePe Payment Gateway.
- Logs the raw callback data for debugging purposes.
- Decodes the JSON data to an associative array for easier handling.
- Processes the callback based on the event type (e.g., PAYMENT_SUCCESS, PAYMENT_FAILURE).
Verifying Callback Authenticity
The most important thing when handling callbacks is security. PhonePe Payment Gateway verifies the legitimacy of callbacks with a signature technique. You may use your API key and salt to calculate the amount and compare it with the received X-VERIFY header to validate the callback.
Testing Callbacks
Use PhonePe Payment Gateway sandbox environment for extensive testing following the implementation of the callback handling mechanism. To verify the effectiveness of your callback handling procedures, simulate several circumstances, including successful and unsuccessful payments as well as timeouts.
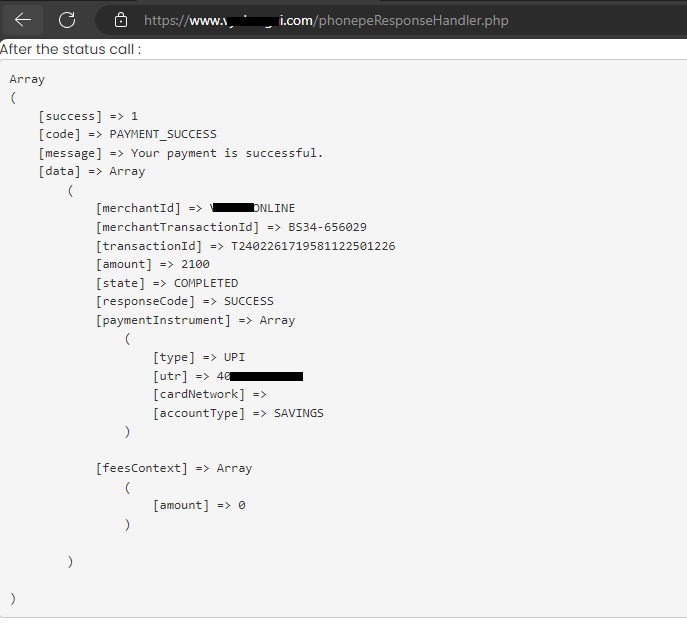
For testing purpose uncomment the code below from responsehandler.php file,
echo " After the status call : ";
echo '<pre>';
print_r($decoded_response);
echo '</pre>';
It will print the response in your browser something like below:
Issue: Response Array is null
If the response received is null i.e. blank array, there can be multiple issues,
- Firstly, you may need to reverify the redirectMode mode to $POST in phonepeRequestHandler.php
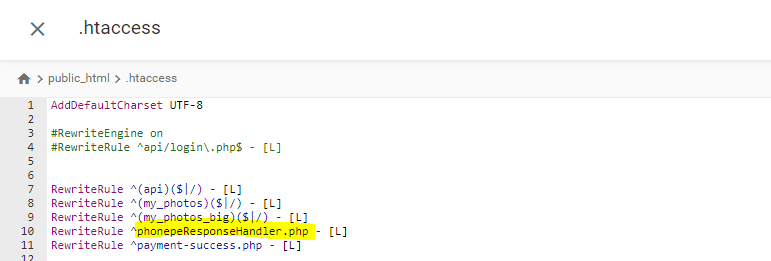
- If the redirectMode is set correctly to $POST, then other common issue is the .htaccess file having redirection issue due to rewriting rules.
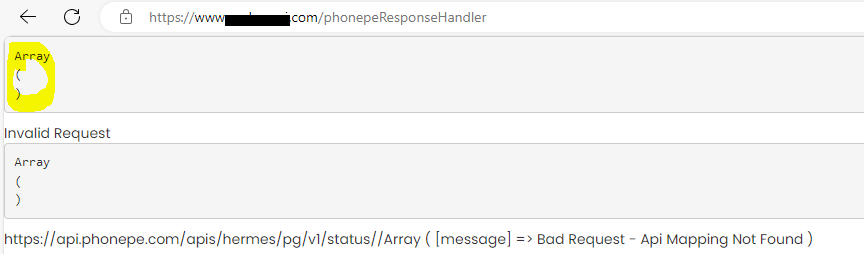
If the error response is empty as shown below, make sure to verify your .htaccess file as $_POST method is not returning any response because the phonepeResponseHandler.php is being redirected by the rewriting rules. Add the exception for your phonepeResponseHandler to ignore redirection as below:
RewriteRule ^phonepeResponseHandler.php – [L]
Chapter 6: Implementing Security Best Practices
Prioritising security is essential as you get closer to finishing your PhonePe Payment Gateway integration process in order to protect your system and the private data of your users. We’ll look at key security best practices in this chapter that each PHP developer should follow to provide a safe and reliable payment environment.
1. Secure Communication (HTTPS)
When communicating with PhonePe Payment Gateway API from your server, always utilise HTTPS. Sensitive information transferred during payment transactions cannot be intercepted or tampered with by unauthorised parties if the data is encrypted while in transit. Make sure the SSL/TLS settings on your server is current, and think about utilising contemporary security measures.
2. Input Validation and Sanitization
Verify and clean up every user input, particularly the ones that are connected to the payment process. Before processing every transaction, use server-side validation to reject malicious or incorrect inputs. By doing this, you reduce the possibility of injection attacks and guarantee the accuracy of the data in your application.
3. Protecting API Keys and Secrets
Keep your PhonePe API keys and other sensitive information private. Refrain from explicitly hardcoding sensitive information in publicly accessible files or your source code. To store these secrets, use secure configuration files located outside of the webroot or environment variables. Change credentials as necessary and rotate API keys on a regular basis.
4. Server-Side Signature Verification
Use server-side signature verification to confirm the legitimacy of receiving callbacks. PhonePe use signatures, specifically the X-VERIFY header, to verify that callbacks come from their system. Using your API key and salt, compare the computed value with the received signature. Handle callbacks that have legitimate and authentic signatures only.
5. Regular Security Audits
Perform routine vulnerability analyses and security audits for your payment integration. Keep up with the most recent security patches and upgrades for the web server software, operating system, and any third-party libraries or dependencies your application uses on your server.
6. PCI DSS Compliance
Comply with the Payment Card Industry Data Security Standard (PCI DSS) if your application processes credit card data. Adhere to PCI DSS rules to protect cardholder information, keep your network safe, and put robust access restrictions in place.
7. Logging and Monitoring
Establish thorough recording procedures to keep an eye on all activity connected to payments. Note pertinent information, including timestamps, user IDs, and transaction amounts. Examine logs on a regular basis to spot unusual or suspicious activity and take appropriate action.
8. User Authentication and Authorization
Make sure your application has strong user permission and authentication systems. To limit access to critical payment-related functionality, use role-based access control (RBAC), multi-factor authentication (MFA), and strong password regulations.
9. Error Handling
Put secure error handling procedures in place to stop sensitive data from being revealed in error messages. While tracking specific failures internally for debugging, provide consumers with error messages that are easy to understand.
10. Stay Informed and Update Dependencies
Keep an eye out for security flaws and dangers inside the PHP environment. Update the frameworks and libraries that your application depends on on a regular basis to correct any security flaws that may be found over time.
You can protect your application from possible attacks and help your users have a safer online payment experience by integrating these security best practices into your PhonePe Payment Gateway integration. With security in place, you’re ready to go through the last chapter, where we’ll go over the essential points and provide advice on how to keep your PhonePe integration optimised and maintained.
Conclusion: Elevate Your PHP Application with PhonePe
Congratulations on completing this comprehensive guide on PhonePe Payment Gateway integration using PHP! By now, you’ve gained a deep understanding of the integration process, from setting up your development environment to implementing secure transaction flows and handling callbacks. Let’s recap the key takeaways and outline the next steps to ensure ongoing success and optimization.
Recap of Key Takeaways
- Understanding PhonePe Payment Gateway:
- Explored the simplicity of onboarding new users.
- Benefited from the current offering of free integration without any commission.
- Setting Up Your Development Environment:
- Established a robust development environment conducive to efficient integration.
- Exploring PhonePe API:
- Delved into the details of PhonePe API endpoints and functionalities.
- Initiating Transactions with PHP:
- Successfully initiated transactions, incorporating PHP into the payment flow.
- Handling Callbacks and Responses:
- Implemented robust mechanisms for managing callbacks and processing responses.
- Implementing Security Best Practices:
- Strengthened your application’s security with HTTPS, input validation, key protection, and more.
Next Steps and Ongoing Maintenance
As you prepare to launch your PHP application with PhonePe Payment Gateway integration, consider the following next steps:
- Thorough Testing: Before going live, conduct extensive testing to ensure the seamless functioning of payment transactions in various scenarios.
- Documentation Review: Document the integration details comprehensively for future reference and for any team members involved in maintaining or updating the integration.
- Monitoring and Analytics: Implement monitoring tools to keep a close eye on transaction activities. Analyze user behaviors and transaction patterns to optimize the payment experience.
- User Education: If applicable, provide clear instructions to users about the payment process, ensuring a smooth and transparent experience.
- Ongoing Optimization: Stay informed about updates to PhonePe’s API and adapt your integration accordingly. Explore new features and optimizations to enhance the overall user experience.
Elevating User Experience and Boosting Business Growth
By incorporating PhonePe Payment Gateway into your PHP application, you have not only simplified the payment process but also gained access to a larger audience of consumers who choose this popular payment option. Your users’ trust is increased, client loyalty is fostered, and business growth is ultimately driven by the smooth and secure transaction experience you’ve put in place.
The environment of online payments will change in tandem with technology. To satisfy the changing demands of your users, be educated, stay flexible, and keep improving your application. Encouraging creative payment options like PhonePe enables developers of all skill levels to produce products that stand out in the cutthroat world of today’s digital marketplace.
We appreciate your participation as we learn how to integrate the PhonePe Payment Gateway using PHP. We hope all of your future endeavours bring you great success and that your applications flourish in providing outstanding user experiences along with safe and effective payment processing.
It’s perfect time to make some plans for the future and it is time to be happy. I have read this post and if I could I desire to suggest you few interesting things or tips. Maybe you could write next articles referring to this article. I want to read more things about it!
It抯 really a nice and helpful piece of info. I am glad that you shared this helpful information with us. Please keep us up to date like this. Thanks for sharing.
Your creativity knows no bounds! This artwork is a masterpiece. The details and emotions conveyed are simply breathtaking.